Hi3861使用NNOM实现人工智能神经网络之MNIST

1、什么是NNOM
请查看之前的帖子:https://ost.51cto.com/posts/12287
2、什么是MNIST
每当我们学习一门新的语言时,所有的入门教程官方都会提供一个典型的例子——“Hello World”。而在机器学习中,入门的例子称之为MNIST。
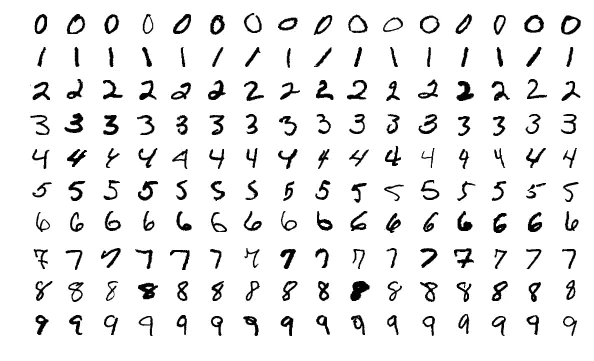
MNIST是一个简单的视觉计算数据集,它是像下面这样手写的数字图片:

MNIST 经常被用来做为分类任务的入门数据库使用。在这个简单的例子里面,我们也用它来试试数据归类。
3、移植和编译
移植NNOM库的方法,在之前已经有说明。
$(wildcard $(LIBPATH)/nnom/src/backends/*.c) \
$(wildcard $(LIBPATH)/nnom/src/core/*.c) \
$(wildcard $(LIBPATH)/nnom/src/layers/*.c) \
同时移植了mnist-simple下面的两个.h文件。
#include "lib/nnom/examples/mnist-simple/image.h"
#include "lib/nnom/examples/mnist-simple/weights.h"
核心的几个函数。
const char codeLib[] = "@B%8&WM#*oahkbdpqwmZO0QLCJUYXzcvunxrjft/\\|()1{}[]?-_+~<>i!lI;:,\"^`'.   ";
void print_img(int8_t * buf)
{
    for(int y = 0; y < 28; y++)
    {
        for (int x = 0; x < 28; x++)
        {
            int index =  69 / 127.0 * (127 - buf[y*28+x]);
            if(index > 69) index =69;
            if(index < 0) index = 0;
            DEBUG_printf("%c",codeLib[index]);
            DEBUG_printf("%c",codeLib[index]);
        }
        DEBUG_printf("\n");
    }
}
// Do simple test using image in "image.h" with model created previously.
void mnist(int index)
{
    uint32_t tick, time;
    uint32_t predic_label;
    float prob;
    DEBUG_printf("\nprediction start.. \n");
    tick = hi_get_milli_seconds();
    // copy data and do prediction
    memcpy(nnom_input_data, (int8_t*)&img[index][0], 784);
    nnom_predict(model, &predic_label, &prob);
    time = hi_get_milli_seconds() - tick;
    //print original image to console
    print_img((int8_t*)&img[index][0]);
    DEBUG_printf("Time: %d tick\n", time);
    DEBUG_printf("Truth label: %d\n", label[index]);
    DEBUG_printf("Predicted label: %d\n", predic_label);
    DEBUG_printf("Probability: %d%%\n", (int)(prob*100));
}
void nn_stat()
{
    model_stat(model);
    printf("Total Memory cost (Network and NNoM): %d\n", nnom_mem_stat());
}
4、MNIST使用
我是在Micropython下使用的,其实主要的几个函数,如下,可以自行移植测试。
STATIC mp_obj_t machine_ai_nnom_test(mp_obj_t self_in,mp_obj_t data_in) {
    int num = mp_obj_get_int(data_in);
    // create and compile the model
    model = nnom_model_create();
    // dummy run
    model_run(model);
    mnist(num);
    nn_stat();
    return mp_const_none;
}
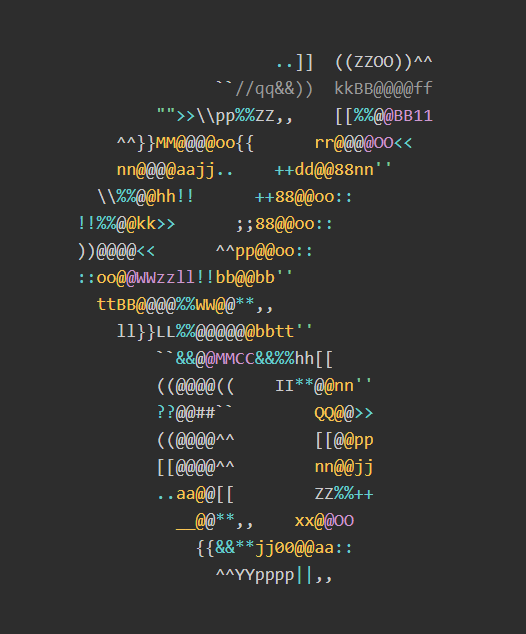
不同的num值,代表候选的要识别的数字的字节图。比如8,存储的字节符合是这样的。

因为不方便输入手写数字,只能通过这种字符的形式进行测试。
5、总结
这是比较简单的例子,对系统的要求的比较低,识别的时间也很短。同时,也可以自己训练模型,进行分析。但该部分不是本文的重点,敢兴趣的同学,可以自行去github上,进行深入的学习。下一篇,会针对KWS的功能测试,实现实时音频输入关键词识别的demo的移植和演示。
© 版权声明
文章版权归作者所有,未经允许请勿转载。
 蜀ICP备20004578号