前言
学习 HarmonyOS ArkUI(JS) 也有一段时间了,为了检验自己的成果,基于现掌握的 FA 相关知识,编写一个可能会在日常开发中遇到的简单计时器组件。
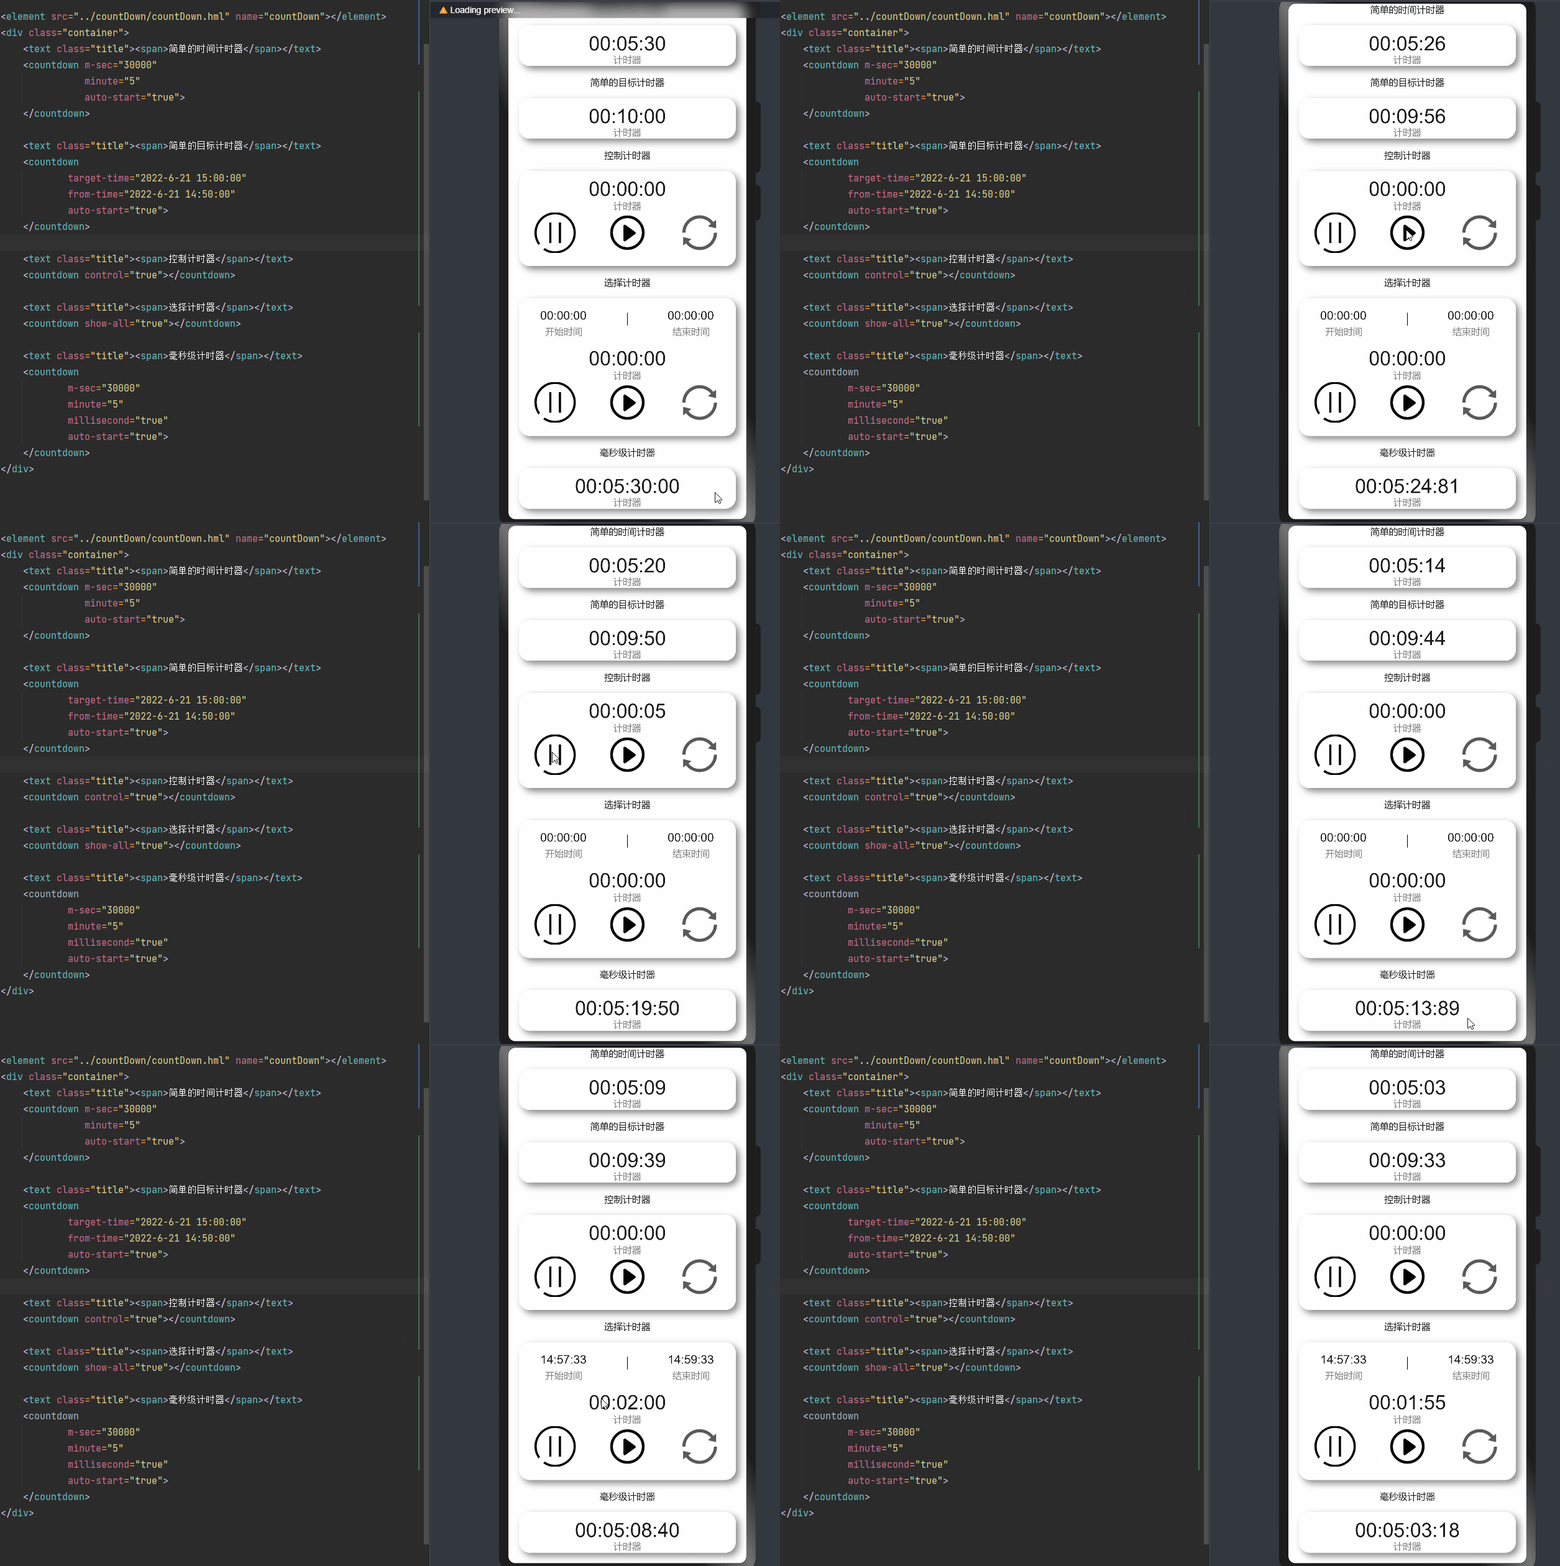
此组件基于 JS 扩展的类Web开发范式开发的组件,通过传入时间参数可以实现简单计时功能,也可以传入其他参数以显示手动控制计时和手动选择时间功能。
效果展示

props
**注意:**仅需要计时时,可直接传入时间(mSec,sec,minute,hour,targetTime,fromTime),然后传入属性autoStart=’true’自动计时即可,其中fromTime、targetTime与前面的四个单位属性不能共用。
|
参数 |
说明 |
类型 |
默认值 |
|
mSec |
倒计毫秒数,如3000毫秒 |
Number |
0 |
|
sec |
倒计秒数,如100秒 |
Number |
0 |
|
minute |
倒计分钟数,如80分钟 |
Number |
0 |
|
hour |
倒计小时数,如25小时 |
Number |
0 |
|
targetTime |
目标时间,如”2022-6-21 10:00:00″ |
String |
‘’ |
|
fromTime |
开始时间,如”2022-6-21 10:00:00″ |
String |
‘’ |
|
autoStart |
自动计时 |
Boolean |
false |
|
control |
显示手动控制图标 |
Boolean |
false |
|
showAll |
显示时间选择区,点击数字开启 |
Boolean |
false |
|
millisecond |
开启毫秒级计时 |
Boolean |
false |
实现代码
1、首先,将传入或者设置的时间转成毫秒数,并格式化字符串显示
timeToString(value) { // 毫秒时间转换
    let secondTime = parseInt(value / 1000), // 秒
        minuteTime = 0, // 分
        hourTime = 0, // ⼩时
        millisecond = Math.floor((value % 1000)/10)
    if (secondTime > 60) { //如果秒数⼤于60,将秒数转换成整数
        minuteTime = parseInt(secondTime / 60);//获取分钟,除以60取整数,得到整数分钟
        secondTime = parseInt(secondTime % 60);//获取秒数,秒数取佘,得到整数秒数
        if (minuteTime > 60) {//如果分钟⼤于60,将分钟转换成⼩时
            hourTime = parseInt(minuteTime / 60);//获取⼩时,获取分钟除以60,得到整数⼩时
            minuteTime = parseInt(minuteTime % 60);//获取⼩时后取佘的分,获取分钟除以60取佘的分
        }
    }
    let result = "";
    if(this.millisecond){  // 毫秒计时
        this.delay = 30;
        result = ":" + this.sizeFormat(millisecond) + "" + result;
    }
    result = "" + this.sizeFormat(secondTime) + "" + result;
    if (minuteTime >= 0) {
        result = "" + this.sizeFormat(minuteTime) + ":" + result;
    }
    if (hourTime >= 0) {
        result = "" + this.sizeFormat(hourTime) + ":" + result;
    }
    // 保存时间数据
    this.countDownTimeText = result;
    this.hourTime = hourTime;
    this.minuteTime = minuteTime;
    this.secondTime = secondTime;

    return result;
},
// 格式化,小于10则前加0
sizeFormat(value){
    let val = parseInt(value)
    return val>=10?''+val:'0'+val
},
2、启动定时器
startTiming(){
    if (this.countDownTime && this.order == false) {  // 倒计时
        this.timer = setInterval(()=>{
            this.timeToString(this.countDownTime);
            this.countDownTime = this.countDownTime - this.delay;

            if(this.countDownTime <= 0){
                this.countDownTimeText = '00:00:00';
                clearTimeout(this.timer);
            }
        },this.delay)
    }else {  // 顺计时
        this.order = true;
        this.timer = setInterval(()=>{
            this.timeToString(this.countDownTime);
            this.countDownTime = this.countDownTime + this.delay;
        },this.delay)
    }
}
3、hml 绑定数据
<div class="countDown">
    <slot name="before"></slot>
    <div class="content">
        <!-- 手动时间选择 -->
        <div class="select" if="{{ showAll }}">
            <div class="start">
                <picker type="time"
                        value="{{startTimeText?startTimeText:'00:00:00'}}"
                        containsecond="true"
                        hours="24"
                        class="pickertime"
                        onchange="startSelect"></picker>
                <text class="tips"><span>开始时间</span></text>
            </div>
            <div class="line"></div>
            <div class="stop" onclick="pickerShow">
                <picker type="time"
                        value="{{stopTimeText?stopTimeText:'00:00:00'}}"
                        containsecond="true" hours="24"
                        class="pickertime"
                      onchange="stopSelect"></picker>
                <text class="tips"><span>结束时间</span></text>
            </div>
        </div>
        <!--计时器显示区-->
        <div class="count">
            <text class="time"><span>{{countDownTimeText?countDownTimeText:'00:00:00'}}</span></text>
            <text class="tips"><span>计时器</span></text>
        </div>

        <!-- 手动控制开启、暂停、重置 -->
        <div class="img" if="{{ showAll||control }}">
            <image src="../countDown/common/pause.png" class="img_item" onclick="pause"></image>
            <image src="../countDown/common/start.png" class="img_item" onclick="start"></image>
            <image src="../countDown/common/reset.png" class="img_item" onclick="reset"></image>
        </div>
    </div>
    <slot name="after"></slot>
</div>
4、其他代码
(1)手动控制 js
start(){
    clearInterval(this.timer)
    this.startTiming()  // 开启定时器
},
pause(){
    clearInterval(this.timer)
},
reset(){
    this.countDownTime = this.initTime  // 回归初始时间
    this.order = false  // 倒计时模式
    this.timeToString(this.countDownTime)  // 格式化时间字符串
    clearInterval(this.timer)
},
(2)css
.countDown {
    flex-direction: column;
    background-color: white;
    width: 100%;
    font-size: 24px;
    border-radius: 16px;
    margin: 16px;
    box-shadow :5px 5px 8px 0px #888888
}
.line{
    height: 30%;
    width: 1px;
    background-color: black;

}
.content{
    flex-direction: column;
}
.select{
    justify-content: space-around;
    align-items: center;
    height: 70px;
}
.start,.stop{
    margin-top: 18%;
    flex-direction: column;
}
.img{
    height: 70px;
    align-items: center;
    justify-content: space-around;
    margin-bottom: 20px;
}
.img_item{
    width: 64px;
    height: 64px;
}
.pickertime{
    font-size: 18px;
}
.tips{
    text-align: center;
    font-size: 14px;
    color: gray;
    height: 20px;
}
.count{
    margin-top: 10px;
    width: 100%;
    text-align: center;
    flex-direction: column;
    height: 60px;
}
.time{
    text-align: center;
}
总结
到这里此组件基本完成,容易出错的点主要在定时器是否需要被清除, 相当于学习了鸿蒙的开发,自己尝试封装,让自己更加了解鸿蒙开发。欢迎各位开发者一起讨论与研究,本次分享希望对大家有所帮助。
© 版权声明
文章版权归作者所有,未经允许请勿转载。
 蜀ICP备20004578号