正文
本期,笔者将详细介绍游戏的一个重要功能——数字填入的制作方法。
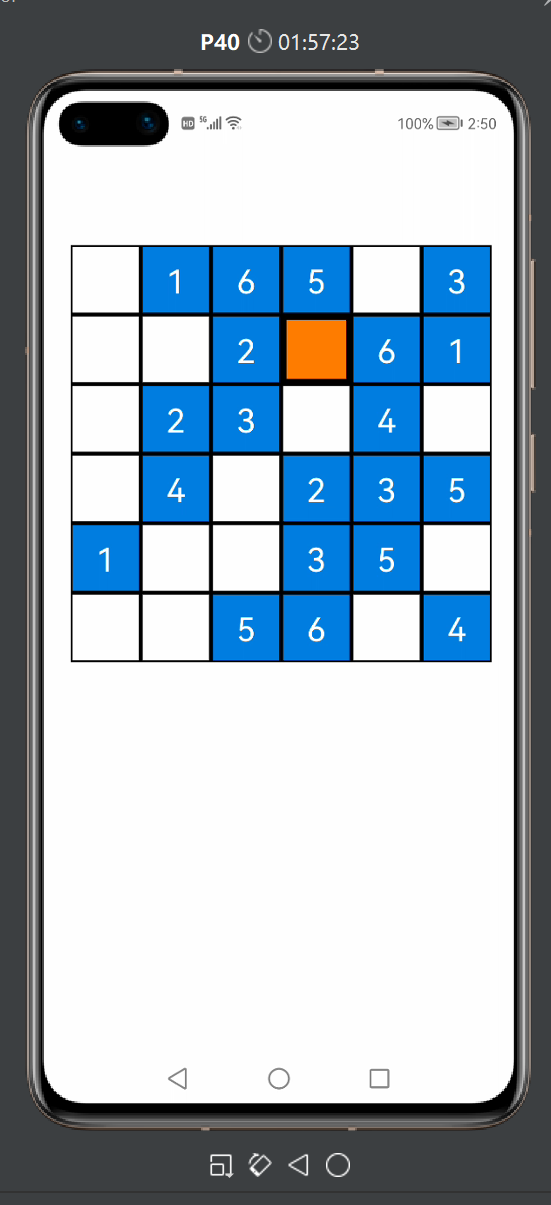
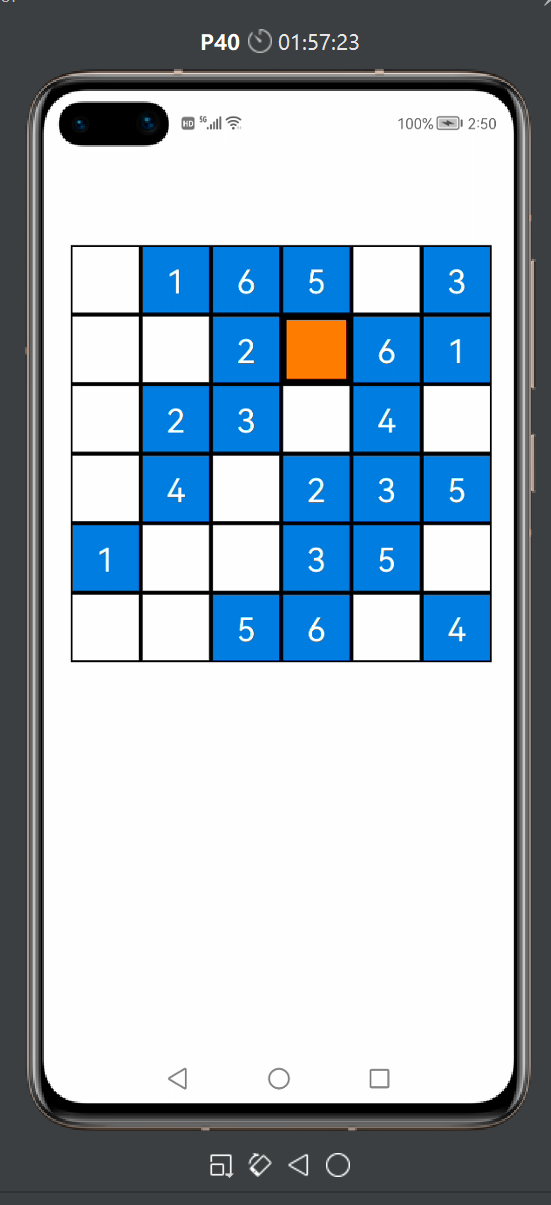
这个功能的制作分为两部分。第一个部分是让白色的Button组件(即网格区域中的白色方格)在被用户点击的情况下能获得焦点,效果图如下:

图中橙色的格子代表这个Button组件处于焦点状态(此方格是最后一个被用户点击的Button组件),可供用户输入数字。显然,这样做的好处在于定位用户想要交互的网格,以方便用户执行数字填入的操作。
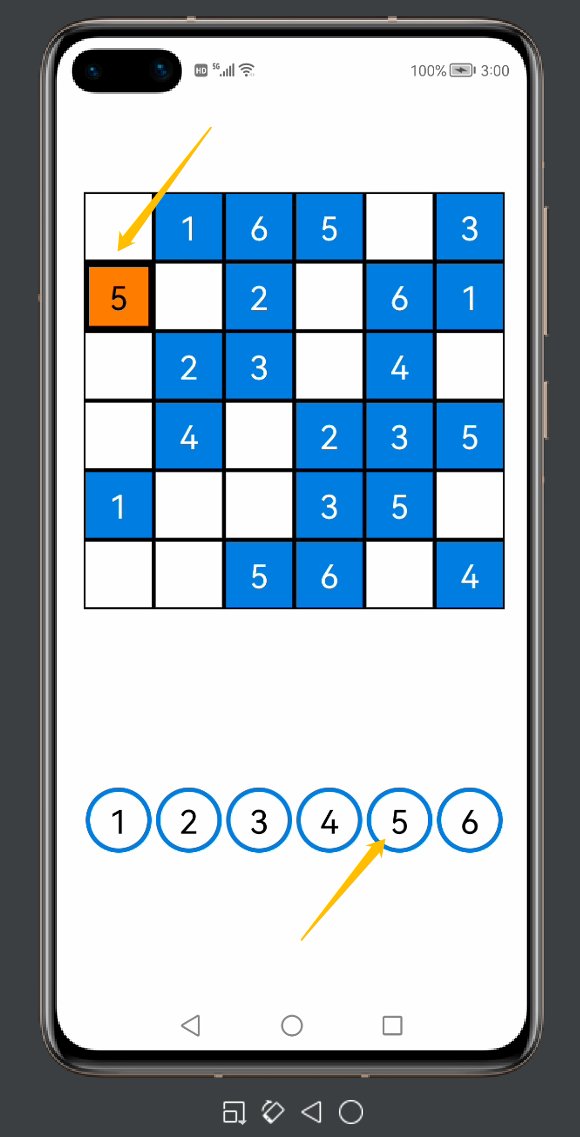
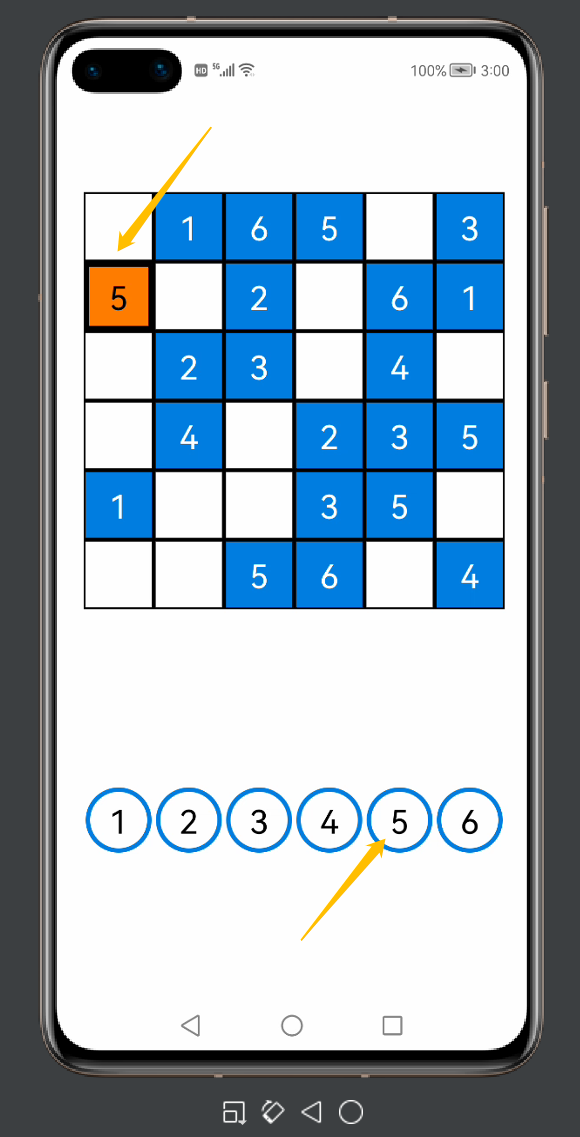
第二个部分则是提供数字填入的按钮以及增加填入数字的逻辑代码,效果图如下:

图中,笔者先是点击了网格区域中第二行第一列的白色格子,然后再点击标有数字5的圆形按钮,于是第二行第一列的格子内便生成数字5。如果点击其他圆形按钮,那么方格内就会生成其他数字。
下面笔者将介绍具体的步骤。
让白色方格能通过点击获得焦点
首先,我们先定义一个新的ShapeElement对象,在网格区域中的某个白色的Button组件获得焦点后,这个Button组件就会使用此ShapeElement对象定义背景元素(即变成橙色):
ShapeElement element1=new ShapeElement();
        element1.setRgbColor(new RgbColor(255,125,0));    //将RGB的颜色设置为橙色
        element1.setStroke(12,new RgbColor(0,0,0));
接着,我们先在GameAbilitySlice中找到上期写入的二重for循环的代码:
for (y=0;y<6;y++){
            for (x=0;x < 6; x++) {
                Button button = new Button(this);
                number=grid_c0[x][y];
                string0=String.valueOf(number);
                button.setText(string0);
                button.setTextColor(Color.WHITE);
                button.setTextSize(75);
                button.setComponentSize(160, 160);
                button.setContentPosition(65+160* x, 230+160*y);
                if (number==0) {
                    button.setText("");
                    button.setBackground(element0);
                    button.setTextColor(Color.BLACK);
                }else{
                    button.setBackground(element3);
                }
                layout1.addComponent(button);
            }
        }
这段代码是本项目中非常重要的代码,他相当于整个游戏的基本框架。在后期的功能制作中,笔者将基于这个二重for循环的框架增加许多逻辑代码。
这里,我们在这段代码的基础上增加一些代码:
for (y=0;y<6;y++){
            for (x=0;x < 6; x++) {
                Button button = new Button(this);
              //将组件设置为可触摸获得焦点
                button.setTouchFocusable(true);
                button.setTextColor(Color.WHITE);
                button.setTextSize(75);
                button.setComponentSize(160, 160);
                button.setContentPosition(65+160* x, 230+160*y);
                if (number==0) {
                    button.setText("");
                    button.setBackground(element0);
                    button.setTextColor(Color.BLACK);
//设置焦点感知监听器
                    button.setComponentStateChangedListener(new Component.ComponentStateChangedListener() {
                        @Override
                        public void onComponentStateChanged(Component component, int i) {
                            if (ComponentState.isStateMatched(ComponentState.COMPONENT_STATE_FOCUSED,i)){
                                button.setBackground(element1);
                            }else{
                                button.setBackground(element0);
                            }
                        }
                    });
                }else{
                    button.setBackground(element3);
                }
                layout1.addComponent(button);
            }
        }
在上述代码中,笔者首先将for循环中的Button对象设置为可通过触摸获得焦点,接着在if的一个判断分路(number==0)中加入组件状态感知监听器:当某个满足number=0的Button组件(即网格区域中的白色方格)获得焦点时,它将改用element1作为背景元素;当它失去焦点时,它重新将element0作为其背景元素。
打开模拟机,便可查看相应的效果:

提供数字填入的按钮以及增加填入数字的逻辑代码
首先,我们先创建两个Button对象:
button_temp = new Button(this);//用于数字输入
        button_empty=new Button(this);  //用于取消焦点
        for (y=0;y<6;y++){
            for (x=0;x < 6; x++) {
               ...
         }
    }
之后,我们还需要在二重for循环的内部写入相应代码:
for (y=0;y<6;y++){
            for (x=0;x < 6; x++) {
                Button button = new Button(this);
                button.setTouchFocusable(true);
                button.setTextColor(Color.WHITE);
                button.setTextSize(75);
                button.setComponentSize(160, 160);
                button.setContentPosition(65+160* x, 230+160*y);
                if (number==0) {
                    button.setText("");
                    button.setBackground(element0);
                    button.setTextColor(Color.BLACK);
//设置button的点击监听器
                 button.setClickedListener(new Component.ClickedListener() {
                        @Override
                        public void onClick(Component component) {

//当某个Button对象被点击时,这个Button对象将被赋给button_temp
                            button_temp = button;
                        }
                    });
                    button.setComponentStateChangedListener(new Component.ComponentStateChangedListener() {
                        @Override
                        public void onComponentStateChanged(Component component, int i) {
                            if (ComponentState.isStateMatched(ComponentState.COMPONENT_STATE_FOCUSED,i)){
                                button.setBackground(element1);
                            }else{
                                button.setBackground(element0);
                            }
                        }
                    });
                }else{
                    button.setBackground(element3);
//设置Button对象的点击监听器
               button.setClickedListener(new Component.ClickedListener() {
                        @Override
                        public void onClick(Component component) {
//当某个Button对象被点击时,这个Button对象将被赋给button_empty
                            button_temp=button_empty;
                        }
                    });
                }
                layout1.addComponent(button);
            }
        }
在这次的修改中,我们为网格区域的白色网格与蓝色网格分别增加了两个监听器,使得这两种类型的网格被点击时,button_temp或者button_empty被赋予所点击的Button对象。
接着,我们需要在GameAbilitySlice的UI界面加入6个圆形按钮:
先创建这6个按钮的背景元素:
ShapeElement element2=new ShapeElement();
        element2.setRgbColor(new RgbColor(255,255,255));
        element2.setShape(ShapeElement.OVAL);        //将组件形状设置为圆形
        element2.setStroke(10,new RgbColor(0,125,225));
然后,我们利用代码布局创建6个button对象,代码如下:
Button button_input1=new Button(this);
        button_input1.setText("1");
        button_input1.setTextColor(Color.BLACK);
        button_input1.setTextSize(75);
        button_input1.setBackground(element2);
        button_input1.setComponentSize(150, 150);
        button_input1.setPosition(70,1600);
        button_input1.setClickedListener(new Component.ClickedListener() {
            @Override
            public void onClick(Component component) {
                button_temp.setTextColor(Color.BLACK);
                button_temp.setText("1");
            }
        });
        layout1.addComponent(button_input1);
        Button button_input2=new Button(this);
        button_input2.setText("2");
        button_input2.setTextColor(Color.BLACK);
        button_input2.setTextSize(75);
        button_input2.setBackground(element2);
        button_input2.setComponentSize(150, 150);
        button_input2.setPosition(70+160*1,1600);
        button_input2.setClickedListener(new Component.ClickedListener() {
            @Override
            public void onClick(Component component) {
                button_temp.setTextColor(Color.BLACK);
                button_temp.setText("2");
            }
        });
        layout1.addComponent(button_input2);
        Button button_input3=new Button(this);
        button_input3.setText("3");
        button_input3.setTextColor(Color.BLACK);
        button_input3.setTextSize(75);
        button_input3.setBackground(element2);
        button_input3.setComponentSize(150, 150);
        button_input3.setPosition(70+160*2,1600);
        button_input3.setClickedListener(new Component.ClickedListener() {
            @Override
            public void onClick(Component component) {
                button_temp.setTextColor(Color.BLACK);
                button_temp.setText("3");
            }
        });
        layout1.addComponent(button_input3);
        Button button_input4=new Button(this);
        button_input4.setText("4");
        button_input4.setTextColor(Color.BLACK);
        button_input4.setTextSize(75);
        button_input4.setBackground(element2);
        button_input4.setComponentSize(150, 150);
        button_input4.setPosition(70+160*3,1600);
        button_input4.setClickedListener(new Component.ClickedListener() {
            @Override
            public void onClick(Component component) {
                button_temp.setText("4");
            }
        });
        layout1.addComponent(button_input4);
        Button button_input5=new Button(this);
        button_input5.setText("5");
        button_input5.setTextColor(Color.BLACK);
        button_input5.setTextSize(75);
        button_input5.setBackground(element2);
        button_input5.setComponentSize(150, 150);
        button_input5.setPosition(70+160*4,1600);
        button_input5.setClickedListener(new Component.ClickedListener() {
            @Override
            public void onClick(Component component) {
                button_temp.setText("5");
                  }
        });
        layout1.addComponent(button_input5);
        Button button_input6=new Button(this);
        button_input6.setText("6");
        button_input6.setTextColor(Color.BLACK);
        button_input6.setTextSize(75);
        button_input6.setBackground(element2);
        button_input6.setComponentSize(150, 150);
        button_input6.setPosition(70+160*5,1600);
        button_input6.setClickedListener(new Component.ClickedListener() {
            @Override
            public void onClick(Component component) {
                button_temp.setText("6");
            }
        });
        layout1.addComponent(button_input6);
虽然这段代码看起来很长,但实际上每个Button对象的代码模板都是一样的。在这段代码中,每个Button对象都定义了6个属性和一个监听器,这6个属性包括——组件显示的文本(Text),组件的显示的文本的颜色(TextColor),组件的显示的文本的大小(TextSize),组件的背景元素(Background),组件的尺寸(ComponentSize),组件的坐标(Position),而监听器中设置的执行事件则是为button_temp定义文本内容(即在白色方格上生成数字)。可以看出,每个圆形按钮的点击监听器中的指令都是面向button_temp的,而button_temp又取决于用户所点击的网格区域的button组件。所以笔者在创建button_temp与button_empty时,并没有定义它们的属性,button_temp的作用是作为数字输入的桥梁,而button_empty的作用则是防止用户点击网格区域的蓝色网格时,上一个获得焦点的白色网格仍然可以输入这么一个BUG。
我们再重新捋一捋数字输入的逻辑:
首先,我们随机点击网格区域中的一个白色Button对象(即白色方格),这个白色Button对象获得焦点变成橙色,并且这个白色Button对象被赋给了button_temp(即button_temp=button);之后,我们点击标有数字5的圆形按钮,则button_temp的显示文本内容被设置成“5”,又因为:button_temp=button,所以前面的操作等价于将获得焦点的Button对象(即橙色方格)的显示文本内容设置成“5”,于是我们可以在模拟机上看到,橙色的格子生成数字5。当我们点击其他白色方格或者蓝色方格时,原先处于焦点状态的橙色方格因为失去焦点,颜色恢复为白色。

结尾
本期的内容就先分享到这里,更多关于数独小游戏项目精彩的内容我将在下期继续为大家揭晓。
 蜀ICP备20004578号