前言
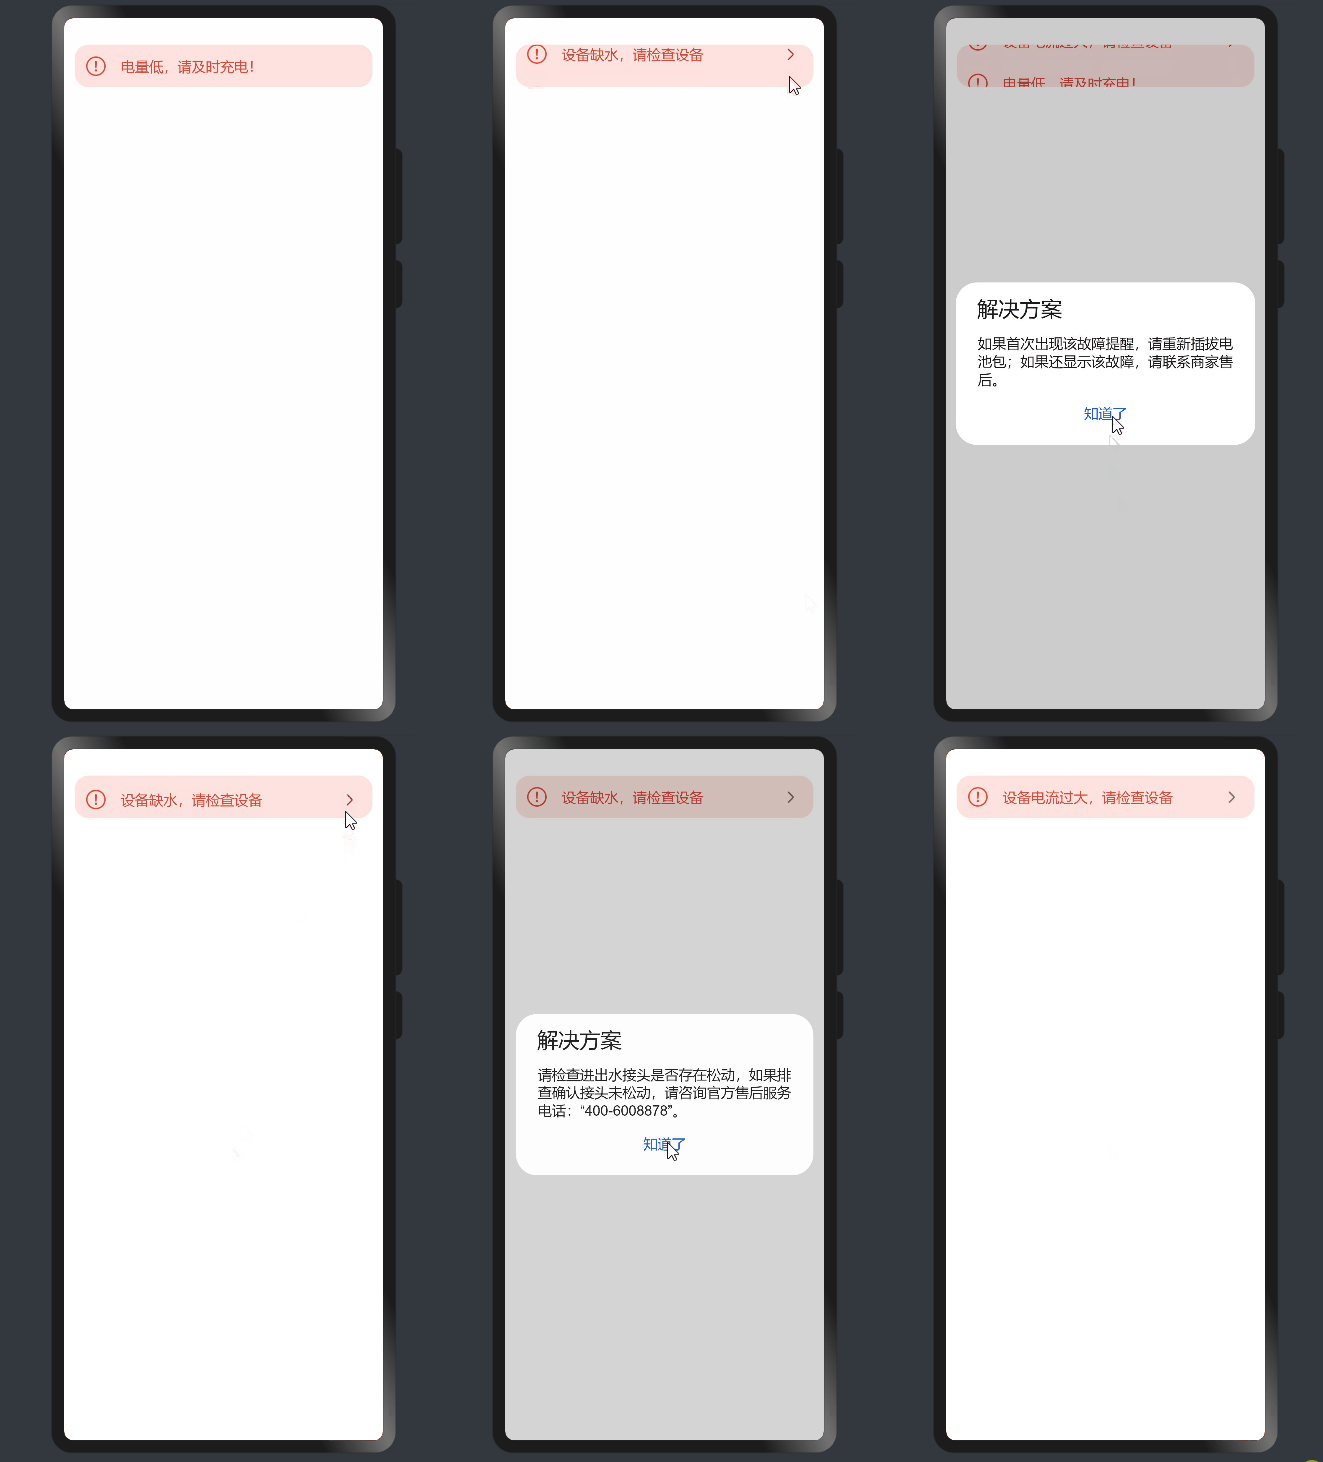
最近刚接触基于openHarmony开源框架的应用开发,特别是基于TS扩展的声明式开发。本文主要结合Harmony官网上的ETS相关组件及API实现日常开发中常见的故障循播效果,以此熟悉ETS下的一些基础组件的应用。
UI开发模式

效果演示

实现步骤
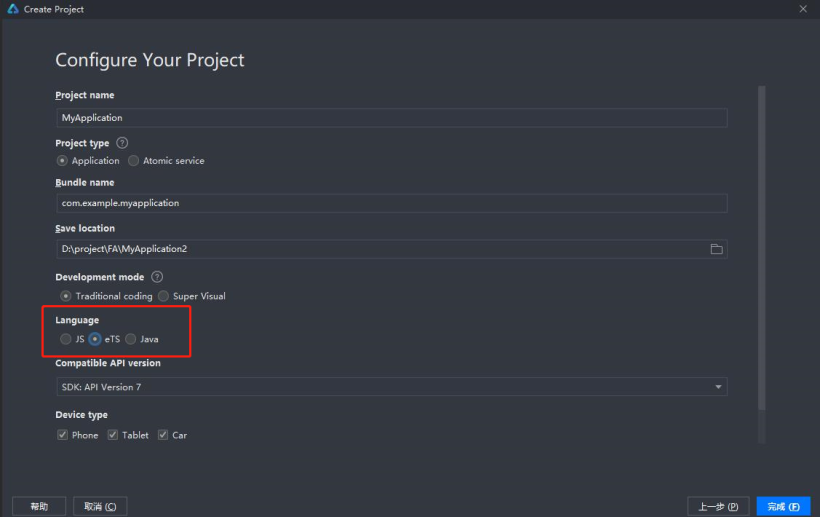
1、新建项目

2、页面布局
创建弹性Flex布局,使用Swiper容器组件,Text、Image基础组件。
build() {
    Flex() { //弹性布局
      Swiper() { //滑动容器,提供切换子组件显示的能力
          Flex() {
            Image($r('app.media.ic_warn'))//图片组件,用来渲染展示图片。
            Text() //文本,用于呈现一段信息。
            Image($r('app.media.ic_arrow'))//图片资源放于resource文件夹下的media文件夹下
          }
      }
    }
  }
3、以“.”链式调用的方式配置UI结构及其属性、事件等
build() {
    Flex({ direction: FlexDirection.Row, alignItems: ItemAlign.Center }) { //弹性布局
      Swiper() { //滑动容器,提供切换子组件显示的能力
        Flex({ direction: FlexDirection.Row, alignItems: ItemAlign.Center }) {
          //图片组件,用来渲染展示图片
          Image($r('app.media.ic_warn'))
            .width(24)
            .height(24)
            .margin({ top: 12, left: 12, bottom: 12 })
            .objectFit(ImageFit.Fill)
          //文本,用于呈现一段信息
          Text('电量低,请及时充电!')
            .width('75%')
            .textOverflow({ overflow: TextOverflow.None })
            .fontSize(16)
            .fontColor(0xd94838)
            .fontWeight(FontWeight.Medium)
            .margin({ top: 14, left: 16, })
            .padding({ bottom: 15 })
          //图片资源放于resource文件夹下的media文件夹下
          Image($r('app.media.ic_arrow')).width(12)
            .height(24)
            .margin({ top: 12, right: 12, bottom: 12 })
            .objectFit(ImageFit.Fill)
        }
      }
      .margin({ top: 30, right: 12, left: 12, })
      .height(48)
      .borderRadius(16)
      .backgroundColor(0xfce3df)
      .index(1)
      .autoPlay(true)
      .interval(1000)
      .indicator(false)
      .loop(true)
      .duration(1500)
      .vertical(true)
      .disableSwipe(true)
    }
  }
Swiper相关属性。
|
名称 |
参数类型 |
默认值 |
描述 |
|
index |
number |
0 |
设置当前在容器中显示的子组件的索引值。 |
|
autoPlay |
boolean |
false |
子组件是否自动播放,自动播放状态下,导航点不可操作。 |
|
interval |
number |
3000 |
使用自动播放时播放的时间间隔,单位为毫秒。 |
|
indicator |
boolean |
true |
是否启用导航点指示器。 |
|
loop |
boolean |
true |
是否开启循环。 |
|
duration |
number |
400 |
子组件切换的动画时长,单位为毫秒。 |
|
vertical |
boolean |
false |
是否为纵向滑动。 |
|
itemSpace |
Length |
0 |
设置子组件与子组件之间间隙。 |
|
cachedCount |
number |
1 |
设置预加载子组件个数。 |
|
disableSwipe |
boolean |
boolean |
禁用组件滑动切换功能。 |
|
curve |
Curve |
Curve.Ease |
设置Swiper的动画曲线,默认为淡入淡出曲线。 |
|
indicatorStyle |
设置indicator样式 |
Image相关参数和属性。
|
参数名 |
参数类型 |
必填 |
默认值 |
参数描述 |
|
src |
string| PixelMap|Resource |
是 |
– |
图片的数据源,支持本地图片和网络图片,建议使用$r方式来管理需全局使用的图片资源。 |
|
alt |
string |
否 |
– |
加载时显示的占位图。支持本地图片和网络路径。 |
|
objectFit |
ImageFit |
否 |
Cover |
图片的缩放类型。 |
|
objectRepeat |
否 |
NoRepeat |
图片的重复样式,SVG类型图源不支持该属性。 |
|
|
interpolation |
ImageInterpolation |
否 |
None |
设置图片的插值效果,仅针对图片放大插值。SVG类型图源和PixelMap资源不支持该属性。 |
|
renderMode |
ImageRenderMode |
否 |
Original |
图片渲染的模式,SVG类型图源不支持该属性。 |
|
sourceSize |
{width: number,height: number} |
否 |
– |
图片解码尺寸,将原始图片解码成指定尺寸的图片,number类型单位为px。PixelMap资源不支持该属性。 |
|
syncLoad |
boolean |
否 |
false |
是否同步加载图片,默认是异步加载。同步加载时阻塞UI线程,不会显示占位图。 |
4、赋初始值,完善逻辑,实现循环播放
使用ForEach循环遍历所有故障数据,结合if和弹窗组件,实现部分故障有相应解决方案提示框的需求。
@Entry
@Component
struct SwiperExample {
 @State arr: any[] = [{
                          id: 0,
                          tipText: "设备缺水,请检查设备",
                          showMoreIcon: true,
                        }, {
                          id: 1,
                          tipText: "设备电流过大,请检查设备",
                          showMoreIcon: true,
                        }, {
                          id: 2,
                          tipText: "电量低,请及时充电!",
                          showMoreIcon: false,
                        }]
  @State solutionArray: any[] = ["请检查进出水接头是否存在松动,如果排查确认接头未松动,请咨询官方售后服务电话:“400-6008878”。", "如果首次出现该故障提醒,请重新插拔电池包;如果还显示该故障,请联系商家售后。"]
  build() {
    Flex({ direction: FlexDirection.Row, alignItems: ItemAlign.Center }) {
      Swiper() {
        ForEach(this.arr, (item) => {
          Flex({ direction: FlexDirection.Row, alignItems: ItemAlign.Center }) {
            Image($r('app.media.ic_warn'))
               .width(24)
               .height(24)
               .margin({ top: 12, left: 12, bottom: 12 })
              .objectFit(ImageFit.Fill)
            Text(item.tipText)
              .width('75%')
              .textOverflow({ overflow: TextOverflow.None })
              .fontSize(16)
              .fontColor(0xd94838)
              .fontWeight(FontWeight.Medium)
              .margin({ top: 14, left: 16, })
              .padding({ bottom: 15 })
            if (item.showMoreIcon) {
              Image($r('app.media.ic_arrow'))
                .width(12)
                .height(24)
                .margin({ top: 12, right: 12, bottom: 12 })
                .objectFit(ImageFit.Fill)
                .onClick(() => {
                  //弹窗
                  AlertDialog.show(
                    {
                      title: '解决方案',
                      message: this.solutionArray[item.id],
                      confirm: {
                        value: '知道了',
                        action: () => {
                          console.info('Button-clicking callback')
                        }
                      },
                      cancel: () => {
                        console.info('Closed callbacks')
                      }
                    }
                  )
                })
            }
          }
        })
      }
      .margin({ top: 30, right: 12, left: 12, })
      .height(48)
      .borderRadius(16)
      .backgroundColor(0xfce3df)
      .index(1)
      .autoPlay(true)
      .interval(1000)
      .indicator(false)
      .loop(true)
      .duration(1500)
      .vertical(true)
      .disableSwipe(true)
    }
  }
}
总结
此例就基于ETS组件的基本使用,旨在熟悉ETS规范和对组件的初体验。
 蜀ICP备20004578号