ArkUI eTS健康饮食APP之自定义TextPicker组件

前言
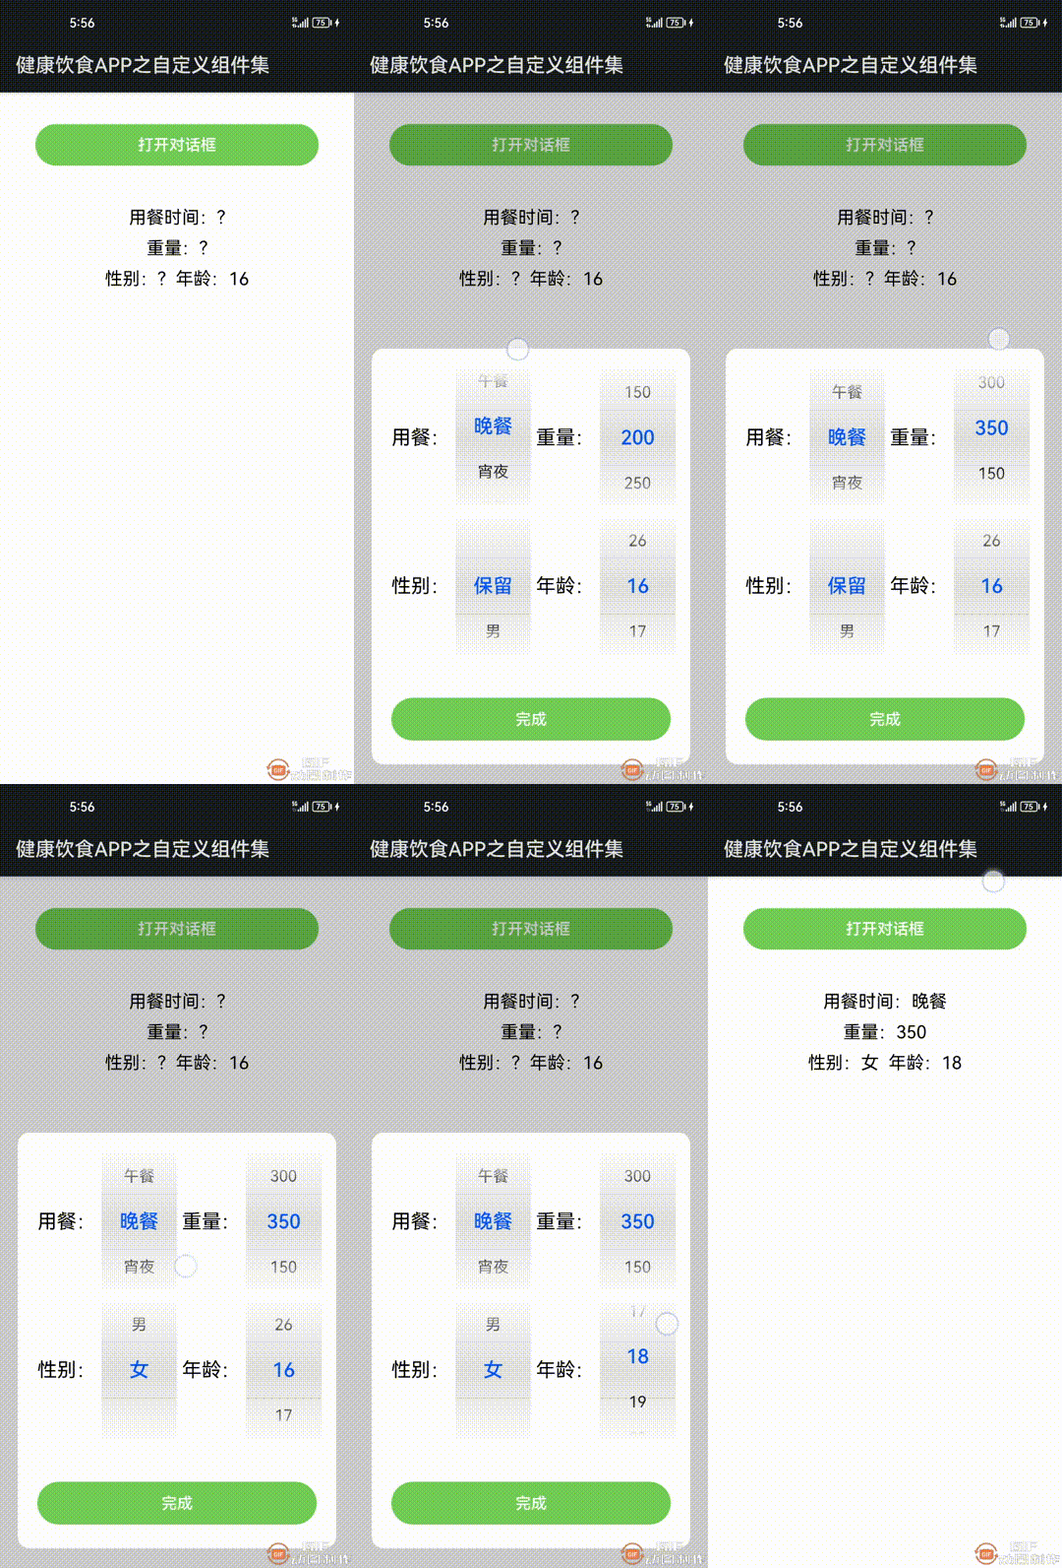
自上一篇 #HarmonyOS ArkUI入门训练营—健康生活实战#健康饮食APP分解 总体介绍显示健康饮食APP的效果,此帖详细介绍基于常用组件TextPicker上,扩展一些样式自定义组件,这里先来了解一下自定义组件成员变量初始化,TextPicker组件的属性和方法,下面先显示此帖子Demo的效果:

自定义组件
组件的成员变量可以通过两种方式初始化,本地初始化,例如:
@State counter: Counter = new Counter()
在构造组件时通过构造参数初始化,例如:
MyComponent({counter: $myCounter})
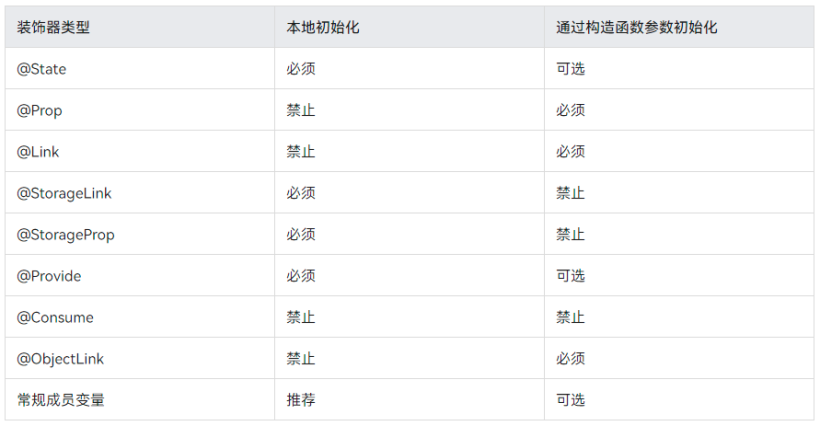
具体允许哪种方式取决于状态变量的装饰器:

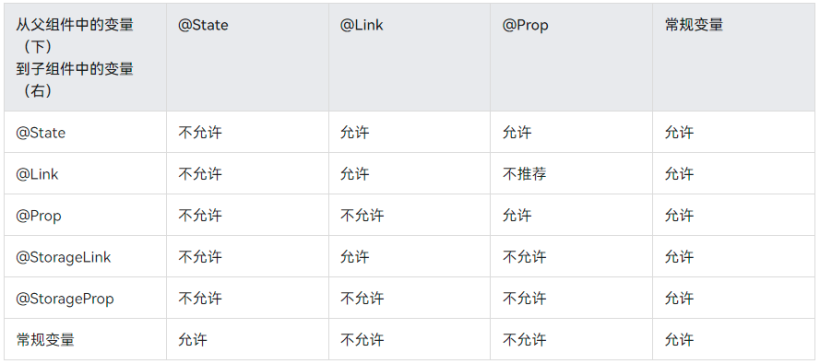
通过构造函数方法初始化成员变量,需要遵循如下规则。

TextPicker组件
参数:

事件:

Demo介绍
创建一个新的eTS文件,用来编写自定义TextPicker组件,代码如下:
@Component
export struct CustomTextPicker {
  @State select: number = 0
  @State ranges: string[] | Resource = undefined
  private changeCallback: (value: string, index: number) => void
  build() {
    TextPicker({ range: this.ranges, selected: this.select })
      .layoutWeight(1)
      .linearGradient({
        angle: 0,
        direction: GradientDirection.Top,
        colors: [[0xfdfdfd, 0.0], [0xe0e0e0, 0.5], [0xfdfdfd, 1]],
      })
      .onChange((value: string, index: number) => {
        this.changeCallback(value, index)
      })
  }
}
通过import引用自定义TextPicker组件到要使用的页面,创建Sample页面,里面显示一个按钮和一个文本,按钮点击打开一个对话框,对话框里面有四个自定义TextPicker组件,用餐数据源是通过资源文件引用,其它数据源是通过定义变量或直接给出,TextPicker组件rang参数支持字符串数组和Resource资源文件,Sample代码如下:
首先引用自定义组件。
import { CustomTextPicker } from '../components/CustomTextPicker'
在自定义对话框使用。
@CustomDialog
struct Record {
  private controller: CustomDialogController
  private mileTimeLabels:Resource = $r('app.strarray.mealTime_labels')
  private foodWeights: string[] = ['150', '200', '250', '300', '350']
  @Link mileTime: string
  @Link foodWeight: string
  @Link gender: string
  @Link age: number
  onChangeMileTimeCallback(value: string, index: number) {
    console.log('xx '+value + " index: " + index)
    AppStorage.SetOrCreate<string>("mileTime", value)
  }
  onChangeFoodWeightCallback(value: string, index: number) {
    console.log('xx '+value + " index: " + index)
    AppStorage.SetOrCreate<string>("foodWeight", value)
  }
  onChangeGenderCallback(value: string, index: number) {
    console.log('xx '+value + " index: " + index)
    AppStorage.SetOrCreate<string>("gender", value)
  }
  onChangeAgeCallback(value: string, index: number) {
    console.log('xx '+value + " index: " + index)
    AppStorage.SetOrCreate<string>("age", value)
  }
  build() {
    Column({space: 10}) {
      Row({space: 5}) {
        Text('用餐:').fontSize(20)
        CustomTextPicker({select: 0, ranges: this.mileTimeLabels,
          changeCallback: this.onChangeMileTimeCallback})
        Text('重量:').fontSize(20)
        CustomTextPicker({select: 1, ranges: this.foodWeights,
          changeCallback: this.onChangeFoodWeightCallback})
      }.height(140)

      Row({space: 5}) {
        Text('性别:').fontSize(20)
        CustomTextPicker({
            select: 0, ranges: ['保留','男', '女'],
            changeCallback: this.onChangeGenderCallback
            })
        Text('年龄:').fontSize(20)
        CustomTextPicker({
          select: 0, ranges: ['16','17', '18','19', '20','21', '22','23', '24','25', '26'],
          changeCallback: this.onChangeAgeCallback
        })
      }.height(140)
      Button('完成', { type: ButtonType.Capsule, stateEffect: true })
        .height(43)
        .width('100%')
        .margin({ top: 33, left: 72, right: 72 })
        .backgroundColor('#73CD57')
        .onClick(() => {
          this.mileTime = AppStorage.Get("mileTime")
          this.foodWeight = AppStorage.Get("foodWeight")
          this.gender = AppStorage.Get("gender")
          this.age = AppStorage.Get("age")
          this.controller.close()
        })
    }
    .cardStyle()
    .height(420)
    .width('90%')

  }
}
@Styles function cardStyle() {
  .height('100%')
  .padding({ top: 20, right: 20, left: 20 })
  .backgroundColor(Color.White)
  .borderRadius(12)
}
Sample页面完整代码如下:
import { CustomTextPicker } from '../components/CustomTextPicker'
@Entry
@Component
struct SampleCustomTextPicker {
  @State mileTime: string = '?'
  @State foodWeight: string = '?'
  @State gender: string = '?'
  @State age: number = 16
  dialogController: CustomDialogController = new CustomDialogController({
    builder: Record({mileTime: $mileTime, foodWeight: $foodWeight, gender: $gender, age: $age}),
    autoCancel: true,
    alignment: DialogAlignment.Bottom,
    offset: { dx: 0, dy: -20 },
    customStyle: true
  })
  build() {
    Column({ space: 10 }) {
      Button('打开对话框', { type: ButtonType.Capsule, stateEffect: true })
        .height(42)
        .width('80%')
        .margin({ top: 32, bottom: 32 })
        .backgroundColor('#73CD57')
        .onClick(() => {
          this.dialogController.open()
        })
      Text('用餐时间:' + this.mileTime)
        .fontSize(18)
      Text('重量:' + this.foodWeight)
        .fontSize(18)
      Row({space: 10}) {
        Text('性别:' + this.gender)
          .fontSize(18)
        Text('年龄:' + this.age)
          .fontSize(18)
      }
    }
    .width('100%')
  }
}
@CustomDialog
struct Record {
  private controller: CustomDialogController
  private mileTimeLabels:Resource = $r('app.strarray.mealTime_labels')
  private foodWeights: string[] = ['150', '200', '250', '300', '350']
  @Link mileTime: string
  @Link foodWeight: string
  @Link gender: string
  @Link age: number
  onChangeMileTimeCallback(value: string, index: number) {
    console.log('xx '+value + " index: " + index)
    AppStorage.SetOrCreate<string>("mileTime", value)
  }
  onChangeFoodWeightCallback(value: string, index: number) {
    console.log('xx '+value + " index: " + index)
    AppStorage.SetOrCreate<string>("foodWeight", value)
  }
  onChangeGenderCallback(value: string, index: number) {
    console.log('xx '+value + " index: " + index)
    AppStorage.SetOrCreate<string>("gender", value)
  }
  onChangeAgeCallback(value: string, index: number) {
    console.log('xx '+value + " index: " + index)
    AppStorage.SetOrCreate<string>("age", value)
  }
  build() {
    Column({space: 10}) {
      Row({space: 5}) {
        Text('用餐:').fontSize(20)
        CustomTextPicker({select: 0, ranges: this.mileTimeLabels,
          changeCallback: this.onChangeMileTimeCallback})
        Text('重量:').fontSize(20)
        CustomTextPicker({select: 1, ranges: this.foodWeights,
          changeCallback: this.onChangeFoodWeightCallback})
      }.height(140)
      Row({space: 5}) {
        Text('性别:').fontSize(20)
        CustomTextPicker({
            select: 0, ranges: ['保留','男', '女'],
            changeCallback: this.onChangeGenderCallback
            })
        Text('年龄:').fontSize(20)
        CustomTextPicker({
          select: 0, ranges: ['16','17', '18','19', '20','21', '22','23', '24','25', '26'],
          changeCallback: this.onChangeAgeCallback
        })
      }.height(140)
      Button('完成', { type: ButtonType.Capsule, stateEffect: true })
        .height(43)
        .width('100%')
        .margin({ top: 33, left: 72, right: 72 })
        .backgroundColor('#73CD57')
        .onClick(() => {
          this.mileTime = AppStorage.Get("mileTime")
          this.foodWeight = AppStorage.Get("foodWeight")
          this.gender = AppStorage.Get("gender")
          this.age = AppStorage.Get("age")
          this.controller.close()
        })
    }
    .cardStyle()
    .height(420)
    .width('90%')

  }
}
@Styles function cardStyle() {
  .height('100%')
  .padding({ top: 20, right: 20, left: 20 })
  .backgroundColor(Color.White)
  .borderRadius(12)
}
总结
通过此帖,可以简单学会自定义组件,如何引用使用,在健康饮食APP里,已经完成了一小部分内容,接下来继续一个个组件完成,然后拼装就出来一个健康饮食APP了。
© 版权声明
文章版权归作者所有,未经允许请勿转载。
 蜀ICP备20004578号